3D is all the rage these days with the spark of 3D cinema and 3D TVs coming our way. But 3D is not new. Not at all. The first attempts at 3D were done even before the creation of moving pictures. Actually the principles on how we perceive depth were discovered by Euclid in 280AD and the first practical applications were presented at the London World Fair at 1851.
Before we start I would like to apologize for the long post but I feel like I should also explain some things instead of simply pointing out the techniques...
You might feel that 3D is second nature to you since you are viewing things in 3D. Well that's actually technically false. You see, what our eyes see is actually 2D. When you look at this screen you see a flat image. That goes without saying. But what you don't know is that even you are experiencing the everyday world you do not see a 3D image of it. What you see is 2 different 2D images (obtained by your 2 eyes) at different angles of the same view. What this does is give you the ability to perceive depth. I will let the master of comedy George Carlin give you an example of this (the part i am talking about is the part of the video between 5:28-5:50 but please watch the whole clip, it's hilarious) :
But technically you do not see a 3D "image". And I put the word image in quotes because we have associated the word image with 2 dimensional representations. A 3D "image" would be an entire 3D aspect of something. That is, it would include all sides of the view possibly including their interiors. We are unable to perceive such things since we are 3 dimensional beings. I do not want to get too much into it but it is a mathematical fact that in a world with a specific number of dimensions if you project something into a "surface" (again the word surface is used for the sake of making my point) you "lose" one dimension.
So when you project a 3D cube made of wires onto a wall using a light bulb (thus casting it's shadow) you get a 2D image of the cube. Same thing goes for our eyes.
This might be hard for some people to accept but if you close your one eye you will realize that what you see is a 2D image of the world around you much like a TV image. But, you might say, I can still "feel" that even though with one eye closed, what i see is 3D. This is were our sensory system comes in.
You see we perceive 3D by using many mechanisms. Organs that help our orientation, intuition and other things make what our eyes see "become" 3D. One of the main mechanisms though (and the one Euclid talked about and which is the one we will use to make the 3D images) is parallax. From wikipedia "Parallax is an apparent displacement or difference in the apparent position of an object viewed along two different lines of sight".
By combining the two images that our eyes see we can infer the depth of an object. This is the bases of ALL 3D systems in existence (until now that is).
Movies use cameras with 2 lenses that capture the same thing at slightly different angles and project both images onto a special screen but with one modification. The images are polarized. Without getting too much into polarization, it means that light beams from one of the two projectors are aligned vertically and the beams from the other projector are aligned horizontally. With the use of special polarized glasses we can prevent our left eye to see the image of the right projector and vice versa. Thus our eyes are tricked into thinking that what we see is 3D. Our brains that are used to understanding parallax can understand the apparent depth of objects.
This is what we will use for our 3D images as well. Once we decide on a subject we must take two pictures of it at slightly different angles:
 |  |
You might think that these two pictures are identical but they are not. They are slightly different. These are the two images your eyes would see if you stared at this sculpture. The first one is what the left eye would see and the second one is what the right eye would see. We will call them with the very creative names "left" and "right".
Now that we have the images that cause the parallax, we need to find a way to create the illusion of depth perception. There are various ways that are popular and easy to produce. They vary on some attributes that define their characteristics. I will call these attributes:
- Printing (is the technique applicable for printed material?)
- Preserve Color (does the technique preserve the color of the original image?)
- PC (can you view the 3D image on a PC?)
- Cost Free (can you create the 3D image without sophisticated equipment?)
- Easy on Eyes (will watching the image give you a headache?)
- Special Tools Free (does the technique require some special tools to recreate the effect such as a PC, glasses etc? If ticked then no tools are needed)
This is a table showing the various techniques and their attributes:
| Name | Printing | Preserve Color | PC | Cost Free | Easy on Eyes | Special Tools Free |
| Polarized Projection |  |  | | | | * |
| Lenticular Prints | | | | | | ** |
| Flicker | | | | |  | *** |
| Wiggle | | | | | | **** |
| Red Green | | | | | | ***** |
| Cross Eye | | | | | | |
| Mirror | | | | | | ****** |
*(requires glasses and special screen)
**(requires special paper)
***(requires 3D TV)
****(requires PC)
*****(requires glasses)
******(requires a mirror)
****(requires PC)
*****(requires glasses)
******(requires a mirror)
We will now examine each method with a little detail and examples.
Polarized Projection
This is the technique used in 3D cinema. You use 2 projectors that have their light polarized by a special lens filter to project both images on top of each other. The left image is polarized either horizontally or vertically and the right one accordingly. To create the effect you also need a special screen to project to and also special glasses with polarized lenses that block each frame for each eye. It is apparent that this is a very expensive set up especially for simple images. So it is used only in cinemas where the budget is huge by default. (Avatar comes to mind)
Lenticular Prints
In this technique you place a special transparent sheet that contain micro-lenses on top of a specially made print of your two images interlaced. The micro lenses divert the left image to your left eye and the right image to your right eye. But to produce this is costly and also the full effect is not that accurate.
Flicker
This is the technique used in the newly created 3D TV. To see the effect you need a special TV that has a very high refresh rate and also a device (the 3D TVs have it build in, otherwise a separate device is available) that can broadcast the TVs refresh rate and sync. Also a very special set of glasses are needed. These glasses have lenses that can be darkened with the use of a small LCD screen. They also have a blue-tooth receiver. The device on the TV broadcasts the refresh rate and the sync to the glasses. Then it proceeds by displaying both images one at a time each frame at very high speeds. Using no glasses it appears that a mix of both images is displayed but that's because the refresh rate is so high. The glasses will block each eye by darkening the lens at the exact refresh rate with the TV and sync with it as well. This allows only one image per eye which gives the depth perception effect.
The refresh rate is so high that people (the manufacturers at least) say that wearing the flickering glasses will not make you aware of the flickering. Other people (some reviewers at CNET for instance) say that the flickering is slightly noticeable. Until I get my hands on one I am afraid I cannot express an opinion on the matter.
The cost for setting it up is very high so it is not an affordable method.
Wiggle
This is the first affordable method I will demonstrate. To see the image you need a PC (so no printing or other medium). What the method does is simply create an animation of both images that change really fast. This gives you an idea of the depth of the image but it has some downsides. First it produces an animation an so printing is not an option. Second the animation is, as the name suggests, wiggly. Watching it for some time will give you a headache. Before I show you how to create the animation let me show you an example with the above images:

To create this animation you need either a video program or Photoshop (or something similar) that can produce animated GIFs. To do it in Photoshop all you need to is open the first image, load the second as a layer on top of the first. Then you simply open the animation window (Window -> Animation) and then what you have is this:

What you need to do is click the "Duplicates Selected Frame" button:  This will cause the first frame to be duplicated:
This will cause the first frame to be duplicated:
Now all you need to do is hide the top layer for the second frame exposing the first:

The last step is to select "File -> Save for Web & Devices" and simply save the file as an animated GIF. (Note that some image viewers will not display animated GIFs so to test if the animation is OK open the GIF with your web browser by dragging and dropping). Here is another 3D image I took with this technique:

Red Green
This is quite possibly the most well known method of creating 3D images. It relies on a set of special glasses made of paper usually that have lenses made of transparent plastic. The left lense is colored red and the right green. Some variations exist with regards to color but red green is the most popular and the one we will demonstrate here.
This technique works based on the fact that if you look through a red colored plastic, colors other than red appear dark and vise versa. So to produce a red green 3D image all you need to do is simply replace the red channel of the right image with the one from the left (thus making the left image visible to the left eye but less visible to the right eye)
To do this you have to use a program like Photoshop. First open both images and go to the left image. Under "Channels" select the red channel (if you don't see "Channels" simply enable them by selecting Window->Channels):

This will cause the image to turn black and white. While the image is like this select everything (press Ctrl+A) and copy (press Ctrl+C). You are done with the left image. You can close it if you want. Now go to the right image and go to "Channels" again. Select the red channel again which will cause the image to turn black and white but this time simply paste what you previously copied (press Ctrl+V). That was it. Now enable all channels again by pressing on the "RGB" channel and simply save the image somewhere else (otherwise you will override the original which might not be what you want).
If you have red green glasses you can check out some of my examples:


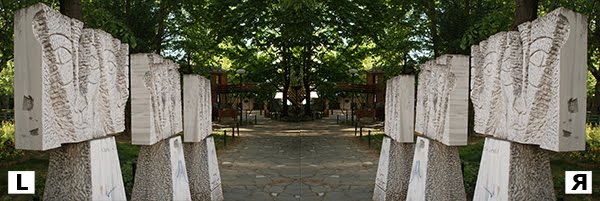
Cross Eye
This is the only technique I demonstrate that does not require any kind of tool to get the effect. But (not) surprisingly it is the hardest for the viewer to see. This relies on the user practicing crossing his eyes at will so that he can overlay the images on top of each other. Before I continue, you can find one of the effects of this method also in the video I posted above with George Carlin. He mentioned a wired fence appearing really close. This is happening because your eyes sometimes get tricked and do not focus on the fence but somewhere in front or behind it. This happens because the fence has repeating patterns that can be overlayed and give the false impression that both your eyes are looking at one of them but in reality you are looking at 2 different ones. This graphic will show you how it works:
This is the normal way you focus:

As you can see, both your eyes look at the center red part giving you a focused view of it. But your eyes can be tricked. They can focus in a point in front of the subject and still give you the impression of focus:

As you can see here, your eyes focused on an imaginary object in front of the subject but both their stares fell on a red part. This gives you the impression that you are focused normally even though you aren't. This also has the side effect that the image appears further away than it actually is. But you can also focus further away, behind the image:

This has the same effect but this time the image appears closer to you than it actually is. As you can image by the graphic, focusing behind the image is harder on the eyes.
There are 2 ways we an use this effect to our advantage. One is used in autostereograms. These are random looking images that reveal a hidden 3D image if you can cross your eyes correctly. Mastering it is not easy but worth it. If you do it enough times then you require no effort to do it. I myself saw my first autostereogram when i was a kid but now I can view them effortlessly. The downside of these images is that you lose all surface color information. All you can see is the depth info with a random looking texture.
The other use (which we will demonstrate) is a simple Stereogram. In this method you simply put the images side by side and let the user cross his eyes so that he overlays them. Before you make the image you need to decide whether you want the user to focus in front or behind the image. Because focusing behind the image is harder, I will demonstrate focusing in front.
If you paid attention to the previous graphics you have noticed that when you focus in front of the image, stuff that are left of the center of the view are looked at by your right eye and vice versa. So in order to get the effect by focusing in front of the images you need to place the right image on the left of the left image. This will make things clear:

If you can focus on a point in front of your screen you will see that you can overlay the images and perceive the 3D effect. I am afraid I cannot explain it any better but I can give you a tip. Place your finger on the screen between the images and instead of focusing on the screen focus on your finger. Then slowly (while keeping your focus on your finger) move the finger closer to you while keeping still in the middle of the images. This will cause the images on the background to become blurry and out of focus. You will notice that at some distance the two images are merged. This is what we want. You will not enjoy the effect with the finger method because the images are out of focus (because focusing is also a lense mechanism. You blur the images when you focus on your finger). But with practice you will be able to do the same without the finger. And when you do you will also be able to keep the images in focus (not blurry).
I believe i don't need to describe how you can place the images side by side in the first place (it's child's play). Here are some more examples:


Mirror
The last method I will demonstrate is very easy and it only requires a small piece of mirror. Because finding a mirror is really easy, I put an orange circle in the table above (tip, you can also use a CD or DVD but the outcome will not be so good). This method is similar to the Cross Eye method in that it consists of putting the two images side by side, but with a small twist. One of them is flipped. The method relies on putting a mirror vertically between the two images and using it to divert the gaze of one of your eyes to the flipped mirror image placing it "on top" of the other. This diagram will demonstrate how it works:

As you can see we place the mirror upright in the middle of the two images and we approach it placing our nose on the back side of the mirror. With our left eye we look at the left image. With our right eye we look at the reflection of the right image. Because we are looking in a mirror, the right image needs to be flipped horizontally (if you prefer to use your left eye for the mirror, you obviously flip everything. You place the mirror the other way and you flip the left image instead of the right).
With a bit of adjusting your gaze you can "place" the right image on top of the other. Please note that in contrast with the Cross Eye method, in this method you place the left image on the left and the right image on the right. This is an example:
I hope you enjoyed this article and that you give some of the techniques a try. If you do, upload them somewhere and post the link in the comments.